

What are Contacts?
Contacts are your address book for blockchain addresses. Instead of seeing: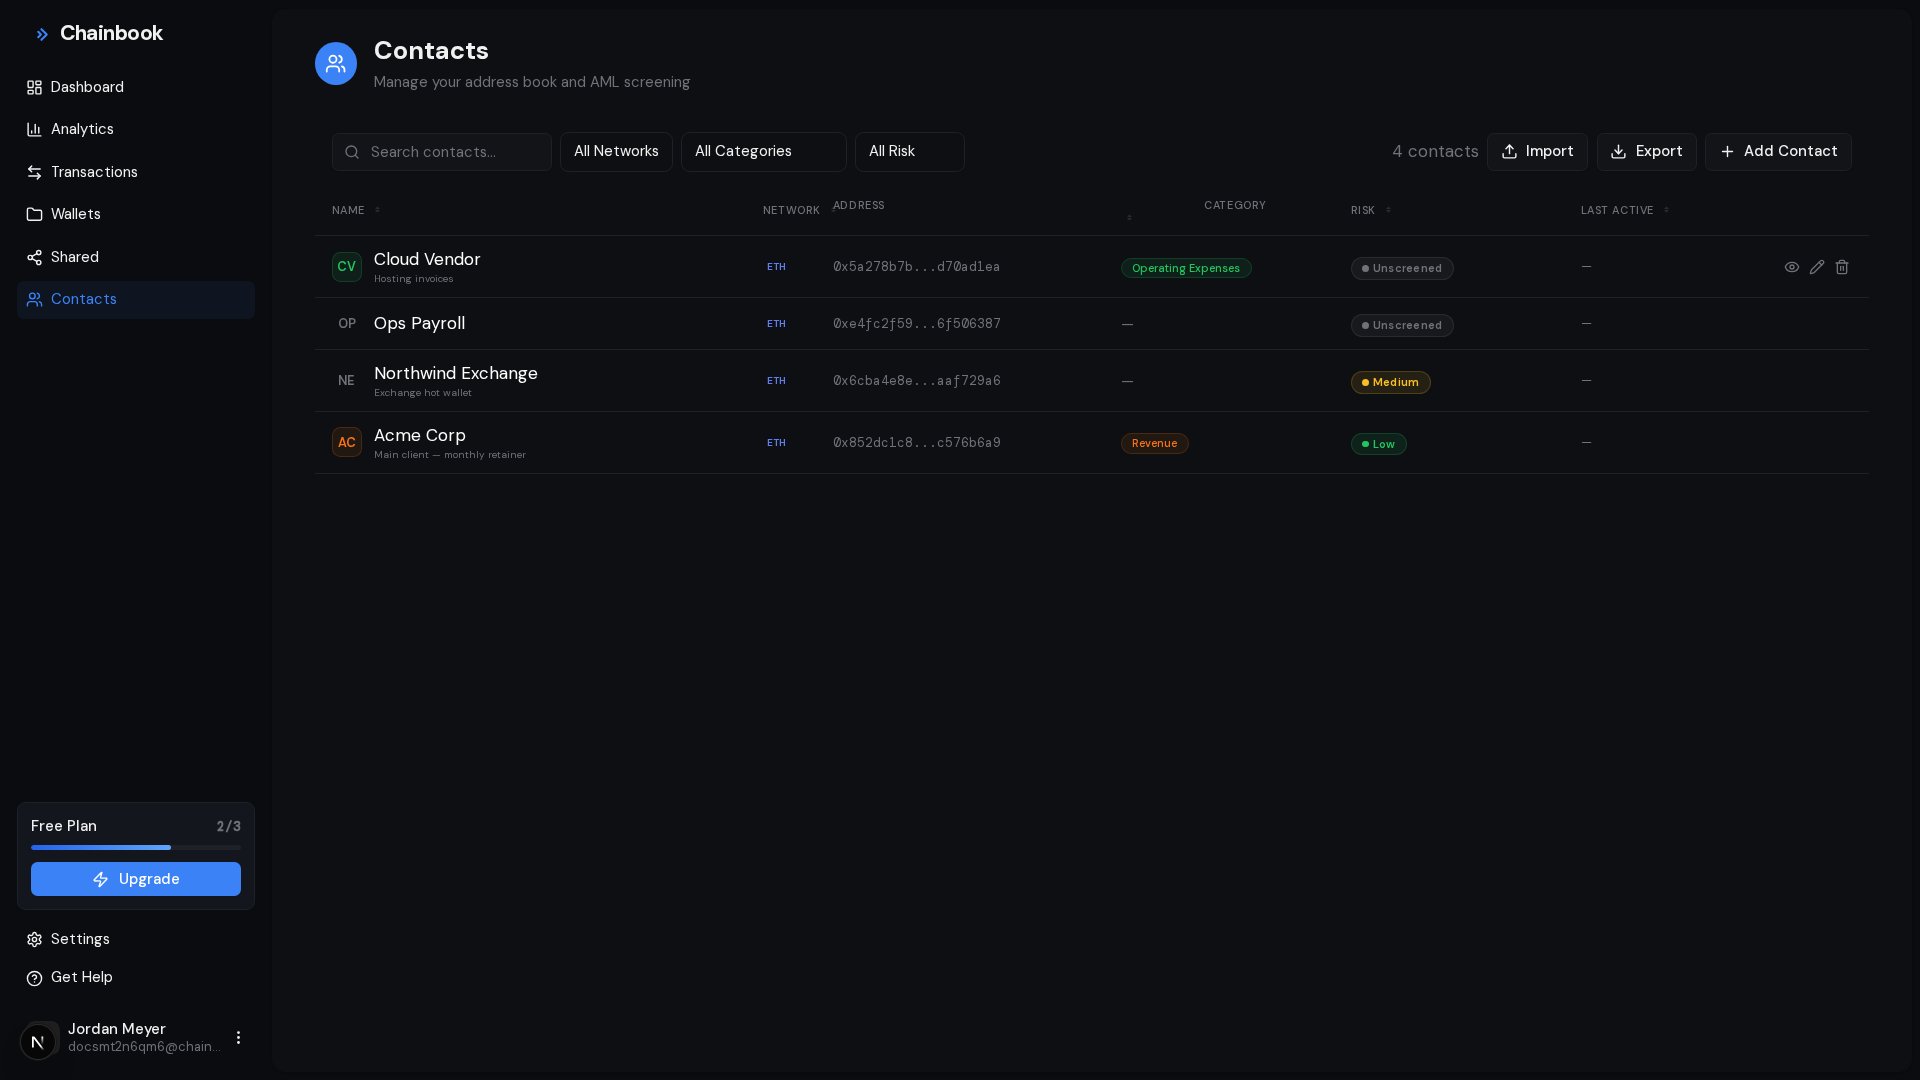
Benefits of Using Contacts
Readable Transactions
Instantly recognize who you’re transacting with.
Better Reports
Exports and charts show names instead of addresses.
Automatic Categorization
A contact’s default category can be applied to its transactions automatically.
Risk Visibility
Screen contacts for AML risk and see risk badges at a glance.
Managing Contacts
Creating a Contact
1
Navigate to Contacts
Click Contacts in the sidebar.
2
Click Add Contact
Click the Add Contact button.
3
Enter contact details
The Category field powers auto-categorization: when the auto-categorize
setting is on, transactions with this contact are automatically assigned
the contact’s default category.
4
Save
Click Create to add the contact.
The contact name now appears everywhere this address is referenced.
Editing a Contact
- Go to Contacts
- Find the contact you want to edit
- Click the Edit button (pencil icon)
- Update the name, address, network, category, or notes
- Click Save
Changing a contact’s name updates it throughout all historical transactions.
Deleting a Contact
- Go to Contacts
- Find the contact to remove
- Click the Delete button (trash icon)
- Confirm deletion
Finding Contacts
The Contacts page is built for large address books:- Search — filter the list by name or address as you type
- Network filter — show only TRON or only Ethereum contacts
- Risk filter — show contacts by AML risk status (Unscreened, Low, Medium, High)
- Sortable columns — click a column header to sort the table
There is no separate detail page per contact. To review a contact’s activity,
use the Contact filter on the Transactions page.
AML Risk Screening
AML screening is available on the Pro and Enterprise plans. Screening
is powered by ScoreChain.
Risk statuses
Every contact carries one of four risk statuses, shown as a colored badge in the contacts table:
Click a risk badge to open a detail popover with more information about the
screening result.
Screening a single contact
- Go to Contacts
- Find the contact
- Click the Screen button on the row
- The risk badge updates when the result comes back
Bulk screening
You can screen many contacts at once — up to 50 contacts per request. Select the contacts you want to screen and run the bulk screening action; each contact’s risk badge updates as results arrive.Re-screening
Screening results are cached for 24 hours. A contact that was screened within the last 24 hours can’t be re-screened until the cooldown ends — this keeps results fresh without wasting screening capacity.Risk in transactions
Counterparty risk isn’t limited to the Contacts page: the transaction details panel shows the counterparty’s risk information, so screening results follow you into your day-to-day transaction review.Where Contacts Appear
Once you create a contact, the name replaces the address in:Contact Organization Tips
Naming Conventions
Use consistent naming patterns: For businesses/exchanges:Important Addresses to Add
Consider adding contacts for:- Exchanges - Your deposit/withdrawal addresses
- Clients/Customers - People who pay you
- Vendors - Services you pay
- Your other wallets - Wallets not tracked in Chainbook
- Team members - Colleagues’ wallet addresses
Filtering by Contact
Once contacts are set up, filter your view:1
Open Transactions
Navigate to the Transactions page.
2
Open the Contact filter
Find the Contact facet in the filter drawer.
3
Select a contact
Choose from your contact list.
Only transactions involving this contact are displayed.
- Track all payments to/from a client
- Review your exchange activity
- Monitor transactions with a specific vendor
Contacts in Reports
Dashboard Charts
The “By Contacts” chart shows:- Transaction volume per contact
- Your top transaction partners
- Distribution of activity
Exports
When you export transactions:- The “From” column shows contact names (when available)
- The “To” column shows contact names (when available)
- Raw addresses appear for unknown addresses
Importing and Exporting Contacts
CSV import
To add many contacts at once, use the built-in CSV import — it’s available to everyone on any plan:1
Open the import modal
On the Contacts page, click the Import button.
2
Choose your CSV file
Select a CSV file with your contacts. Required columns are Name and
Address; Network and Notes are optional — if Network is
omitted, it’s detected automatically from the address format.
3
Review the preview
Chainbook shows a preview of the rows, flagging invalid addresses and
duplicates of contacts you already have.
4
Import
Confirm to import the valid rows.
CSV export
Click the Export button on the Contacts page to download your full contact book aschainbook-contacts.csv.
Privacy Considerations
Contact information is private to your account. Team members you invite can see contacts for shared wallets.
- ✅ Visible to you and your team members
- ✅ Included in exports you download
- ❌ Not shared publicly
- ❌ Not visible to the address owner
Frequently Asked Questions
Can I add any address as a contact?
Can I add any address as a contact?
Yes, you can add any valid wallet address as a contact, even if you don’t track it or own it. This helps identify counterparties in your transactions.
What if the same address has multiple purposes?
What if the same address has multiple purposes?
An address can only have one contact name. Choose the most relevant name, or use a generic description like “Binance - Mixed Use”.
Do contacts sync across wallets?
Do contacts sync across wallets?
Yes, contacts are account-wide. A contact created in one wallet appears in all your wallets that interact with that address.
Can I see an address's full history from the contact?
Can I see an address's full history from the contact?
There’s no per-contact detail page. Use the Contact filter on the Transactions page to see all transactions involving that address across your wallets.
Why can't I re-screen a contact?
Why can't I re-screen a contact?
Screening results are cached for 24 hours. Once the cooldown passes, the Screen button becomes available again.
Are exchange deposit addresses safe to add?
Are exchange deposit addresses safe to add?
Yes. Adding an exchange address as a contact just labels it for your reference. It doesn’t affect the exchange or expose any information.